Solve Problem Windows
>> Wednesday, December 15, 2010
Solutions To Windows Network Connection Problems
Here I will lay out four easy solutions you can try to get your Internet access back. I will give instructions for Windows XP, Vista, and Windows 7.
Check Your Hosts File
Windows can use the hosts file to set IP addresses to particular domains. This means though that it can be used to redirect or effectively cut off your Internet access.
When I need to troubleshoot an Internet connection, this is usually the first place I look.
To view the file in Windows XP, just open up Notepad and go to File->Open. Then, navigate to your C drive, then to the “Windows” Folder, then “System32” folder, then “drivers” folder, then “etc” folder and finally, open the file named “hosts“.
You may have to change where it says “Text Documents” to “All Files” to see the hosts file.

After you have the file open, it should look something like this:

It should only have the heading stuff and maybe the line designating the localhost. Anything else should be deleted.
The instructions are the same for Vista and Windows 7, only instead of just opening Notepad, you have to right click the Notepad icon and choose to “Run as administrator” to edit the file.
Check Your TCP/IP Settings
Another issue may be that your TCP/IP settings were altered in some way.
For XP, got to Control Panel and then Network Connections.
In Windows Vista/7, go to the Control Panel and then the Network and Sharing Center. In 7, click on “change adapter settings.” In Vista, click on “manage network connections“.
In all versions of Windows, after you get to the places designated above, right click the device giving you trouble, either the Wireless card or Ethernet card. Then select “Properties.”

Something looking like the following window should pop up.

Click on Internet Protocol Version 6 and then hit “Properties“. You should see something like the following.

If either the IP or DNS server address are not set to automatic, set them to be automatic.
Repeat this for Internet Protocol Version 4.
Reset Your TCP/IP Manually
Sometimes, you may just need to reset your TCP/IP. This can easily be done at the command line in Windows.
For Windows XP, go to Start->Run. Type “cmd” and press enter. A command window should pop up. Then type “netsh int ip reset c:\resetlog.txt” and press enter. You will then have to restart your computer.

For Windows Vista/7, you have to run the Command Prompt as an administrator. To do that, just type “cmd” in your start menu’s search bar. Right click the “cmd” icon that should come up and select “Run as administrator.” Then type the same as indicated above, press enter, and restart.
Reset Your Winsock Manually
Winsock, short for Windows Socket API, is how Windows handles network services. A reset of this may fix a network problem.
Resetting your Winsock is similar to resetting TCP/IP. Open a Command Prompt as laid out above for your version of Windows and type “netsh winsock reset“. Then press enter and restart your computer.

Sometimes even these steps will not fix a faulty connection. If that’s the case, you can try googling the exact problem or contacting someone with network experience.
If you know any other quick solutions to fixing network connection problems, please lets us know in the comments below.
Shutdown PC with command prompt
Install Windows XP on Asus Eee PC
Summary
In December 2008 i bought online with my credit card (thanks to ePayment) four Asus Eee PCs 4G Surf (two white and two black models) from PCfun. I liked the white ones better so i kept one for myself and the rest i gave them to the family members. Being my first gadget, i was and i'm still very excited about its features. All models come with a friendly linux distro from which you can connect to the Internet very fast. When i got my Eee PC out of the box it took me about 1 to 2 minutes at most to connect to a free wireless network and surf the net. Sweet! I downloaded an MP3 and listened to it just to check the sound and the incorporated speakers from the LCD panel.
I like Linux, but running it as a desktop has no use to me, so i quickly decided to install Windows XP. Let's see how i did it.
PS: most of the tips here might also work with any other desktop or notebook as well.
2. What do you need
If you are in hurry or know what you are doing but forgot some steps, check out this great video tutorial (go to 02:45 min to skip the chit-chat):
4. Installing Windows XP from the USB stick
1. Begin TXT Mode Setup Windows XP, Never unplug USB Drive Until Logon
2. and 3. Continue with GUI Mode Setup Windows XP + Start XP from HD 1
4. Start GRUB4DOS Menu - DOS FPY IMAGES + Linux + XP Rec Cons + VISTA Attended Setup XP, Never unplug USB Drive Until After Logon
You will select 1 and press ENTER. This will start the standard Windows XP setup install (format quick NTFS, create partitions etc). After the setup finished to copy all the files needed it will reboot. Now select 2 and 3 (it's a single tab option). This will continue your installation (the classic graphical Windows install). This might take 20 to 40 minutes. When this is done the netbook will reboot (DO NOT UNPLUG THE USB DEVICE YET!), select the 4th option then the last 'Start/Boot Windows XP from HDD'.
5. Installing ASUS Eee PC drivers
Now you are logged in in Windows XP but you can't do anything because you need the Asus EEPC drivers which can be found on your CD that is shipped with your Asus package. If you don't have the CD then download the drivers from the following locations: RapidShare.de , MegaUpload.com . You will need to unrar the archive and copy it to the stick (create a folder like asuseeepc_drivers/). This folder will contain the following subfolders: ACPI, Audio, Chipset, LAN, Touchpad, vga, Wireless. I suggest you first install the ACPI and Chipset drivers and then the rest. Try to locate the .exe that triggers the installation to start.
6. ASUS Eee PC Tips and Tricks
a. Hardware
There is a big difference between the white and the black models of ASUS Eee PC 4G Surf. The black model Eee PC 4G SURF (4GS-PK008) has a hatch (turn it upside down and you will see it) that allows you to comfortable change the RAM. The white model Eee PC 4G SURF (4GS-W010) lacks of this ability and you will have to disassemble the netbook to upgrade it.
My ASUS Eee PC 4G Surf came with 512Mb of RAM memory and i've succesfuly upgraded it to 2Gb. If you want to upgrade it follow this nice video tutorial.
My ASUS Eee PC 4G Surf came with a solid state HDD with the capacity of 4Gb (this is the internal harddisk). After you install Windows XP you will have around 3 to 2.5 GB left. You can use an external USB drive as a secondary partition and install software, play games, etc. It has to be an USB device with resonable access speed.
If you find browsing with the Touch Pad hard, then i may suggest you go buy the following Microsoft Optical Mouse 500 which i tested and it's tiny, it also has a short cable.
b. Software
I recommend using Windows XP on the ASUS Eee PC with the following settings: System Restore OFF, System Properties -> Advanced tab -> Performance -> Settings -> Visual Effects set to 'Adjust for best performance', here also on the Advanced tab -> Virtual memory change 128 Mb and maximum 256 Mb if you HAD a memory upgrade on the netbook!
Go to Start -> Cmd and in the command prompt type sfc.exe /purgecache. This command does magic, i had 780 mb free space, and after this command i had about 1Gb.
To save space go to C:\WINDOWS\Driver Cache\i386 and delete all the files. You can do the same with the files and folders from C:\WINDOWS\Downloaded Installations when you're done installing software on your Asus Eee PC. Eg. If you install Dreamweaver 8 you will probabil find there a folder called Macromedia Dreamweaver 8 with the main .exe installer and some other files.
Make sure you disabled the system restore from My Computer -> System Restore tab
I was able to run Heroes3 Complete series directly from an external USB device. In the game you will have a small scroll on the bottom of the screen but that will not bother your on this kind of static games. I also played this game wireless with other ASUS Eee PC (now that's a dream come true!)
I was able to run Microsoft Virtual PC 2007 (download here) being installed on C: and running the .vhd (663Mb) and .vmc (12kb) directly from stick. I installed Windows 98SE, mounted Hopkins FBI game and succesfully played it.
I have succesfuly played Starcraft BroodWar on my ASUS Eee PC. I ran it directly from an attached USB stick, also played on BattleNet dozens of games. If already bought Starcraft but want a light version, download this one (100mb) from theabyss.eu.
When you are watching movies on Youtube with Firefox it is recommended to go in Full-Screen mode by pressing F11 or go to 'View' -> 'Full Screen'
If you want to read Word, Excel or Powerpoint files on your Asus Eee PC, download the following free applications from Microsoft's site: Microsoft Word Viewer 2003, Microsoft Excel Viewer 2003, Microsoft PowerPoint Viewer 2003. Note that you can only read, not write! For that you need the Microsoft Office CD or iso.
c. General
Never lift the Eee PC by the display panel
Fully charge the battery before first use and whenever it is depleted to prolong battery life. Be aware that it takes much longer to charge the battery when the Eee PC is in use.
On the lower right of your Eee PC keyboard you will see four LED indicators: Power indicator,
  Battery Charge Indicator,
  Solid State Disk (SSD) indicator and
  Wireless indicator. When the Battery Charge Indicator blinks that means that the battery is less than 10% and AC power is not connected.
It is actually not recommended to use your Eee PC on soft surfaces as beds or sofas because it blocks the vents and the bottom of the netbook can get hot. For example if you let it in your bed and you are watching a movie, you might hear a little noise of fans increasing the speed of ventilation - this is normal.
If you want to use you Eee PC with a projector you can use the 15-pin D-sub monitor port, located on the right side, which supports standard VGA devices.
Your Eee Pc has three USB 2.0 slots and 1 memory card slot. This will allow you to attach removable devices such:
- Introduction
- What do you need
- Creating a bootable USB stick (or hdd)
- Installing Windows XP from the USB stick
- Installing ASUS Eee PC drivers
- ASUS Eee PC Tips and Tricks (hardware & software)
- Article references
In December 2008 i bought online with my credit card (thanks to ePayment) four Asus Eee PCs 4G Surf (two white and two black models) from PCfun. I liked the white ones better so i kept one for myself and the rest i gave them to the family members. Being my first gadget, i was and i'm still very excited about its features. All models come with a friendly linux distro from which you can connect to the Internet very fast. When i got my Eee PC out of the box it took me about 1 to 2 minutes at most to connect to a free wireless network and surf the net. Sweet! I downloaded an MP3 and listened to it just to check the sound and the incorporated speakers from the LCD panel.
I like Linux, but running it as a desktop has no use to me, so i quickly decided to install Windows XP. Let's see how i did it.
PS: most of the tips here might also work with any other desktop or notebook as well.
2. What do you need
- your desktop computer (this is NOT your ASUS Eee PC)
- one image or a cd with Windows XP
- a stick (1Gb is fine) or a USB hdd - make sure you don't have partitions on it or you may loose them in the process
- USB Multiboot software (choose one of the following download locations: CD Forum download, BootLand download, Siginet download)
- your ASUS Eee PC later
If you are in hurry or know what you are doing but forgot some steps, check out this great video tutorial (go to 02:45 min to skip the chit-chat):
- Extract USB Multiboot and browse USB_MultiBoot_10/ folder and then run USB_MultiBoot_10.cmd
- Press any key
- Type H and press ENTER
- HP USB Disk Storage Format Tool screen will appear. If this does not find your USB device you can format it manually from Windows and press 'Close' or you can go back and try option P. Check 'Quick format' and press 'Start'
- In the multiple option screen press 0 and hit enter to toggle between USB Stick and USB harddisk. This is very important because the Windows XP will not install proper if you have a USB harddisk like this one. The 'USB Stick' medium is selected by default.
- Type 1 and press ENTER and then select the Windows XP source (this is the CD or a path on the HDD where your have your XP installation files)
- If you get a message about 'winnt.sif' press 'YES'
- in the 'Unattended Install' screen fill the fields with values (also with your serial). If you fill the fields now you will not need to complete them later in the Windows XP installation screen. When you're done press 'Cancel (no changes)'
- Type 2 and press ENTER and select your USB device
- Type 3 and press ENTER, you will see some files copying on the USB drive. During this you might be asked 'Copy XP and extra sources on the USB?' and press 'Yes'. Now wait couple of minutes (this depends on your system and USB drive speed). You will also get the message 'FileCopy to USB-Drive is Ready - OK - Success' and press YES (Make USB-stick in XP Setup to be Preferred Boot Drive U:)
- All done just press any key
- Connect the USB drive to your ASUS Eee PC
- Start your netbook and in the first screen press F2 to enter BIOS.
- In the BIOS screen go to 'Advanced' tab and change 'OS Installation' to 'Start'.
- Next in the 'Boot' tab under 'Hard Disk Drives' select the USB drive as the 1st Drive
- Also in the 'Boot' tab but under 'Boot Device Priority' section you should see the USB drive as the 1st Boot Device
- 'Exit & Save Changes' made in the BIOS.
1. Begin TXT Mode Setup Windows XP, Never unplug USB Drive Until Logon
2. and 3. Continue with GUI Mode Setup Windows XP + Start XP from HD 1
4. Start GRUB4DOS Menu - DOS FPY IMAGES + Linux + XP Rec Cons + VISTA Attended Setup XP, Never unplug USB Drive Until After Logon
You will select 1 and press ENTER. This will start the standard Windows XP setup install (format quick NTFS, create partitions etc). After the setup finished to copy all the files needed it will reboot. Now select 2 and 3 (it's a single tab option). This will continue your installation (the classic graphical Windows install). This might take 20 to 40 minutes. When this is done the netbook will reboot (DO NOT UNPLUG THE USB DEVICE YET!), select the 4th option then the last 'Start/Boot Windows XP from HDD'.
5. Installing ASUS Eee PC drivers
Now you are logged in in Windows XP but you can't do anything because you need the Asus EEPC drivers which can be found on your CD that is shipped with your Asus package. If you don't have the CD then download the drivers from the following locations: RapidShare.de , MegaUpload.com . You will need to unrar the archive and copy it to the stick (create a folder like asuseeepc_drivers/). This folder will contain the following subfolders: ACPI, Audio, Chipset, LAN, Touchpad, vga, Wireless. I suggest you first install the ACPI and Chipset drivers and then the rest. Try to locate the .exe that triggers the installation to start.
6. ASUS Eee PC Tips and Tricks
a. Hardware
There is a big difference between the white and the black models of ASUS Eee PC 4G Surf. The black model Eee PC 4G SURF (4GS-PK008) has a hatch (turn it upside down and you will see it) that allows you to comfortable change the RAM. The white model Eee PC 4G SURF (4GS-W010) lacks of this ability and you will have to disassemble the netbook to upgrade it.
My ASUS Eee PC 4G Surf came with 512Mb of RAM memory and i've succesfuly upgraded it to 2Gb. If you want to upgrade it follow this nice video tutorial.
My ASUS Eee PC 4G Surf came with a solid state HDD with the capacity of 4Gb (this is the internal harddisk). After you install Windows XP you will have around 3 to 2.5 GB left. You can use an external USB drive as a secondary partition and install software, play games, etc. It has to be an USB device with resonable access speed.
If you find browsing with the Touch Pad hard, then i may suggest you go buy the following Microsoft Optical Mouse 500 which i tested and it's tiny, it also has a short cable.
b. Software
I recommend using Windows XP on the ASUS Eee PC with the following settings: System Restore OFF, System Properties -> Advanced tab -> Performance -> Settings -> Visual Effects set to 'Adjust for best performance', here also on the Advanced tab -> Virtual memory change 128 Mb and maximum 256 Mb if you HAD a memory upgrade on the netbook!
Go to Start -> Cmd and in the command prompt type sfc.exe /purgecache. This command does magic, i had 780 mb free space, and after this command i had about 1Gb.
To save space go to C:\WINDOWS\Driver Cache\i386 and delete all the files. You can do the same with the files and folders from C:\WINDOWS\Downloaded Installations when you're done installing software on your Asus Eee PC. Eg. If you install Dreamweaver 8 you will probabil find there a folder called Macromedia Dreamweaver 8 with the main .exe installer and some other files.
Make sure you disabled the system restore from My Computer -> System Restore tab
I was able to run Heroes3 Complete series directly from an external USB device. In the game you will have a small scroll on the bottom of the screen but that will not bother your on this kind of static games. I also played this game wireless with other ASUS Eee PC (now that's a dream come true!)
I was able to run Microsoft Virtual PC 2007 (download here) being installed on C: and running the .vhd (663Mb) and .vmc (12kb) directly from stick. I installed Windows 98SE, mounted Hopkins FBI game and succesfully played it.
I have succesfuly played Starcraft BroodWar on my ASUS Eee PC. I ran it directly from an attached USB stick, also played on BattleNet dozens of games. If already bought Starcraft but want a light version, download this one (100mb) from theabyss.eu.
When you are watching movies on Youtube with Firefox it is recommended to go in Full-Screen mode by pressing F11 or go to 'View' -> 'Full Screen'
If you want to read Word, Excel or Powerpoint files on your Asus Eee PC, download the following free applications from Microsoft's site: Microsoft Word Viewer 2003, Microsoft Excel Viewer 2003, Microsoft PowerPoint Viewer 2003. Note that you can only read, not write! For that you need the Microsoft Office CD or iso.
c. General
Never lift the Eee PC by the display panel
Fully charge the battery before first use and whenever it is depleted to prolong battery life. Be aware that it takes much longer to charge the battery when the Eee PC is in use.
On the lower right of your Eee PC keyboard you will see four LED indicators:
It is actually not recommended to use your Eee PC on soft surfaces as beds or sofas because it blocks the vents and the bottom of the netbook can get hot. For example if you let it in your bed and you are watching a movie, you might hear a little noise of fans increasing the speed of ventilation - this is normal.
If you want to use you Eee PC with a projector you can use the 15-pin D-sub monitor port, located on the right side, which supports standard VGA devices.
Your Eee Pc has three USB 2.0 slots and 1 memory card slot. This will allow you to attach removable devices such:
- USB mouse
- USB external optical disk drive
- USB external hard disk drive
- USB flash memory disk
- MMC (Multimedia Card)
- MMC Plus
- RS-MMC (Reduced Size) (with MMC adapter)
- SD (Secure Digital)
- MiniSD (with SD adapter)
- microSD
- SD adapter
RAID/SATA SETUP WITH WINXP
There is 3 part of the guide :- Slipsteam the RAID/SATA drivers to the XP Setup and create an updated driver setup disc
- Load the SATA/RAID drivers from floppy (USB Floppy needed for laptops)
- Slipstream only needed driver to the disc using nLite (Not providing help for this one since not written by me & credits to zea)
! I would recommend that if possible use a CD-RW for your work unless of course you don't mind throwing a CD in case something mess up !
! As to simplify most of the errors that i get through PM, I recommend you to use the vanilla version of Windows XP aka clean setup itself without slipstreams. Avoid any "D3vil SP3 Edition" or such. This is due to the fact that some of these CD might have already been slipstreamed with drivers before and the tools listed here might not recognise the previous slipstreamer and mess up the CD. !
There is an increasing amount of thread on the matter and wish that i could be of some help and solve it easy way. I dare not put this in the Guide section so hopefully if its not appropriate here too, Mods please delete the thread or move it elsewhere. Thanks.
Opening :
Even with the existance of Windows Vista, XP nonetheless is still the choice of OS for a lot of people for now. But because of how old XP is to date and with the emerging of new technologies, the original drivers that came with the XP Setup itself is almost obsolete.
To cut the crap short, laptop doesn't have a floppy drive and XP is unable to load SATA/RAID drivers from another location besides floppy. Of course, not all laptop BIOSes can enable native SATA to emulate PATA hence the existance of this guide. So the only ways to install XP on your ub3r new laptop that runs SATA HDD would be to update the driver database in XP Setup itself.
Tools needed :
- Windows XP Setup CD
- DriverPack
- CDIMAGE GUI (http://unattended.msfn.org/files/global/CDIMAGE_GUI.EXE)(Copy and paste link in new window)
- CD/DVD Burner to burn CD
First of all, copy the contents of your CD to a working path, in this case i'll use C:\WINXP
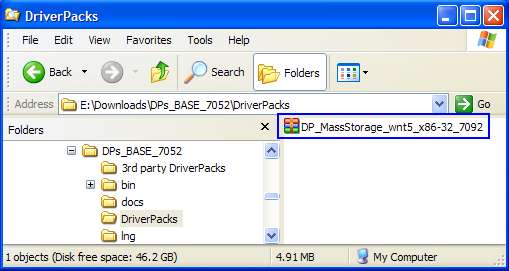
Download DriverPack BASE from the link above as well as DriverPack MassStorage. Extract the BASE pack into a new folder and put the MassStorage pack you downloaded into the DriverPacks folder.
Run DriverPack...

Select "disc" and choose "Browse". Browse the folder which you copied from the CD earlier and in this case it would be my C:\WINXP.
If the setting is grey out like the image below :
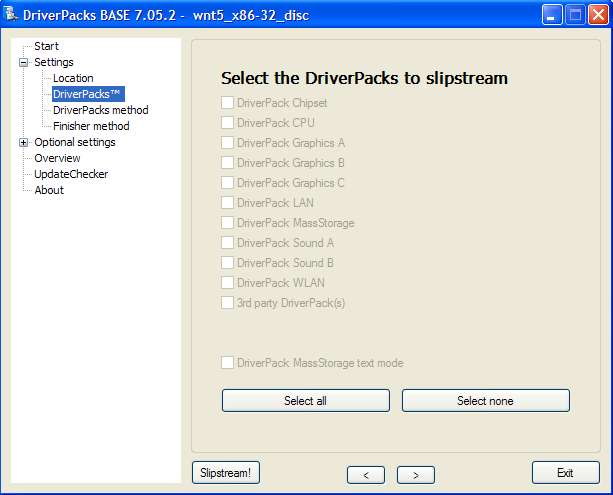
The solution : DO NOT extract the downloaded files into DriverPacks folder. Leave intact as is (i.e. copy that archive into DriverPacks folder). The DPs_BASE will automatically do the extraction. See the image below :
QUOTE(SubKi||er)
..put the MassStorage pack you downloaded into the DriverPacks folder.
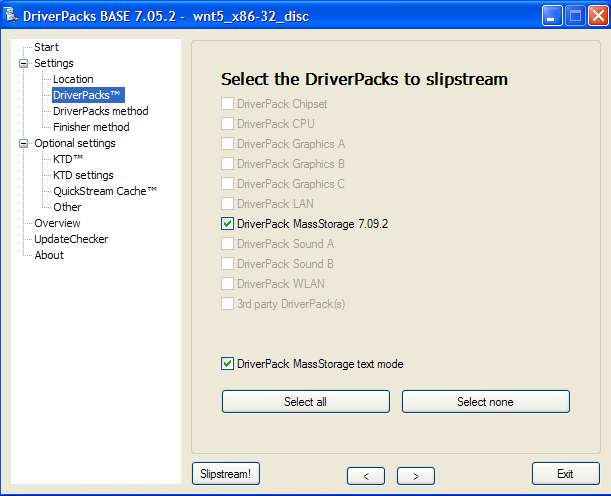
If you do it right, you can have the selection as below
 :
:
Credits: keyz
Execute DPs_BASE.exe and use the installation platform selected to disc. Browse to the XP working directory you copied from the CD just now, in my case C:\WINXP earlier. Select the DriverPacks list that will appear after loading the working directory and put a check mark on DriverPack MassStorage. Put a tick in the box which says "DriverPack MassStorage text mode". Leave all the other settings as it is if you don't know what is it for.

After you're done with everything, hit the SlipStream! button and wait for the process to finish. The process should finish in around 10 minutes. After the slipstream process is finish, proceed by downloading CDIMAGE GUI. Extract and run the application, only change the "Root DIR" to your working directory in my case C:\WINXP and the "Iso file Path" to where you want to save the ISO file generated.

Select the boot.img file to load the bootable image into the ISO file.

Leave all other settings intact as it should unless you know what its doing. (Thanks Sk8teR)
After the ISO file is generated, burn it with any burning software to a CD and proceed with booting the setup. Your SATA hard drive should be recognised now without the need to press F6 and load drivers.
The DriverPack should contain most SATA/RAID device drivers so it should work on most computers. Read more...


