Liga Remaja Kreatif 2015 Raspberry Pi Dan Arduino

>> Wednesday, April 8, 2015


Dengan tema Inovasi jalur Lebar - Gaya Hidup Digital Malaysia, Pertandingan Liga Remaja Kreatif merupakan satu pertandingan kandungan terbitan tempatan terbaik bagi pelajar-pelajar sekolah menengah. Kandungan yang dipertandingkan  adalah dalam bentuk video pendek, aplikasi mobile ,portal web dan yang menarik pada tahun ini diperkenalkan satu lagi kategori baru iaitu Raspberry Pi & Arduino. Sudah tentu ramai pelajar bertanyakan kepada anda, apa itu Raspberry Pi? , apa itu Arduino? Mengapa ianya dipromosikan sebagai satu kategori penting bagi tahun ini?. Sebelum itu kita syarat-syarat pertandingan pada tahun ini bagi kategori tersebut.


LRK 2015 - KATEGORI RASPBERRY PI DAN ARDUINO

Syarat-syarat
1. Peserta dikehendaki untuk menghantar cadangan projek alatan bantu mengajar menggunakan Raspberry Pi atau/dan Arduino.
2. Aplikasi Mudah Alih yang dibangunkan mestilah mempunyai ciri-ciri portal dan perhubungan dua hala serta pelbagai elemen interaktif (dimansuhkan).
3. Peserta juga dikehendaki menghantar keterangan projek mereka dalam bentuk PDF serta perlu menghasilkan video penerangan projek berdurasi tidak lebih dari 1 minit.
4. 10 penyertaan terbaik akan dipilih untuk menghadiri Bengkel Liga Remaja Kreatif 2015 - Raspberry Pi dan Arduino di mana para peserta akan dibekalkan dengan peralatan Raspberry Pi/Arduino dan menghasilkan projek mereka dengan bantuan daripada pakar-pakar yang dijemput khas.

Untuk menjawab persoalan diatas, seterusnya saya akan perkenalkan kepada anda kedua-dua peranti ini.
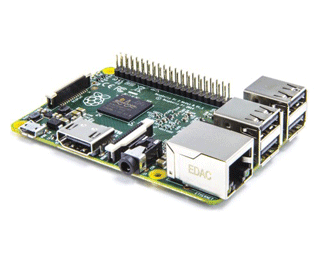
Raspberry Pi 
Raspberry Pi merupakan papan komputer tunggal yang berperanan sebagai sistem kawalan pemprosesan. Ianya terdiri daripada papan litar dilengkapi cip pemprosesan, port input, port output dan juga sokongan simpanan data. Ia hadir dengan beberapa port terbina seperti HDMI (untuk dihubungkan ke monitor atau televisyen), port USB (untuk tetikus dan papan kekunci), dan juga port mikro-SD (untuk ruangan sistem dan fail).

Raspberry Pi hadir dalam saiz sebesar Mykad, Ia hadir dalam dua variasi, iaitu model A dan juga model B. Membezakannya, Model B untuk Raspberry Pi turut hadir dengan sokongan port Ethernet yang membolehkan pengguna menghubungkan talian internet melaluinya. Untuk sokongan kuasa, ia menggunakan kabel mikro-USB yang sedia digunakan pada pelbagai peranti mudah-alih hari ini. Ia juga didatangkan dengan kerangka khusus berasingan sebagai pelindung.


Raspberry Pi dibangunkan oleh Raspberry Pi Foundation bertujuan untuk mempromosikan ilmu asas sains komputer di sekolah. Pada 18 Februari 2015 mereka mengumumkan lebih 5 juta unit telah terjual. Pada bulan ini juga mereka melancarkan model baru Raspberry Pi 2 yang 6 kali lebih pantas dan berkuasa daripada model terdahulu. Apa yang boleh dilakukan oleh Raspberry Pi? Video dibawah menerangkan apa itu Raspberry Pi dan penggunaannya.


Raspberry Pi terkini dikuasai oleh litar Broadcom BCM2836 SoC,dengan  pemproses quad-core ARM Cortex-A7 CPU, VideoCore IV dual-core GPU, 1 GB of RAM dan dilengkapi output HDMI.  Raspberry Pi 2 membawa tanda harga US$35 bagi model B dan US$25 bagi model A. Carian kami di Internet mendapati set ini dijual dengan harga RM160-200 bagi model B. Sudah tentu ianya amat murah dan saiznya yang kompak membolehkan ianya digunakan sebagai satu mesin yang ringan dan mudah-alih.

Raspberry Pi menyokong beberapa sistem operasi yang dikhaskan untuknya seperti Raspbian yang mana merupakan versi Debian untuk Raspberry Pi. Model baru Raspberry Pi 2 dikatakan bakal menyokong Windows 10.  Pihak Raspberry sendiri menyediakan sebuah halaman muat-turun khas untuk beberapa koleksi sistem operasi mereka. Pengguna juga boleh memuat-turun NOOBS atau NOOBS Lite yang menyediakan pemasangan mudah untuk pengguna umum. Video dibawah menunjukan beberapa idea kreatif dalam penggunaan Raspberry Pi oleh peminatnya.


Arduino
Adakah Raspberry Pi dan produk dari Itali, Ardiuno mempunyai fungsi dan peranan yang sama? Saya boleh katakan ianya mempunyai peranan yang agak sama, namun dari segi ciri-ciri yang ditawarkan agak berbeza. Raspberry Pi menyokong sistem perkomputeran yang lengkap, ianya umpama sebuah mini komputer dan anda perlu boot untuk mengaktifkannya, manakala Ardiuno lebih kepada litar kawalan mikro. Perantinya dengan jenama Ardiuno Uno tidak boleh mengawal sistem pengoperasian berskala besar. Namun ianya pilihan yang sempurna untuk penghasilkan projek elektronik yang khusus dan ringkas kerana dapat dihubungkan terus dengan sesebuah modul, komponen atau sensor -dengan arahan pengaturcaraan yang mudah.

Untuk memilih yang mana lebih sesuai, ia bergantung kepada apakah produk prototaip yang ingin anda bangunkan. Jika tidak terlalu kompleks anda tidak perlukan Raspberry Pi, Sebuah Arduino Uno sudah memadai. Namun, bagi kami, Raspberry Pi merupakan satu teknologi yang harus anda terokai pada tahun ini memandangkan prospeknya yang semakin besar serta penawaran kuasa serta sistem operasi yang semakin mesra pengguna. Berikut merupakan perbezaan dari segi spesifikasi antara kedua-dua peranti ini. 
Sudah tentu pengenalan kedua-dua papan litar ini memberi impak yang besar kepada inovasi produk berteraskan ICT. Anda mungkin dapat mengoptimasikan produk yang sedia ada kepada produk yang lebih kecil, murah dan jimat tenaga. Kategori yang diperkenalkan kali ini memang bersesuaian dengan hasrat KPM dalam membentuk pelajar berfikir aras tinggi. 10 pasukan dengan idea projek terbaik akan didedahkan dengan sebuah bengkel yang bakal dianjurkan kelak.


kredit kepada >>>http://bestariproject.blogspot.com/2015/02/lrk-2015-kenali-raspberry-pi-arduino.html

Read more...

HOW INKJET PRINTER WORKS

>> Tuesday, September 27, 2011

Introduction Inkjet Printer
There are many different types of printers on the market today. One of the most popular and widespread technologies is the inkjet printer. This type of printer utilizes very small droplets of ink to create high-quality text, images, or photos on a piece of paper. To its advantage, an inkjet printer is low-cost and very low maintenance—making it the optimal printer for many homes and small businesses. Together with Maxprint Product, the printing cost will be lower and lont lasting for everday use.

How the printer work
Compared to other types of printers, an inkjet printer is not a very complicated piece of equipment. Most inkjet printers only have a few moving parts, and a single printed circuit board (PCB). The major mechanical components of an inkjet include the print head assembly, ink cartridge, print head motor, belt, purge unit and paper feed rollers.

When the printing signals are sent from a computer to the printer, the paper feed roller is instructed to pull a sheet of paper into place. The print head assembly and ink cartridge (sometimes combined as a single unit) are moved back and forth over the paper by the print head motor and belt. As the print head assembly deposits ink on the paper, the feed rollers control the speed of the paper through the printer.

An inkjet printer does not touch the paper when it prints. The ink is sprayed onto the surface with tiny nozzles that are either heat or mechanically activated with a small electrical charge. The amount of ink deposited from each nozzle is so small that it would take more than one million droplets to cover one square inch of paper (most inkjet printers can lay down several million droplets per second!).


Parts inside the printer

There is 3 main part inside the printer: Paper feeding unit, Printing Mechanism Unit and Purge Unit. Here is the introduction of each part.
Paper Feeding Unit
  1. 1. Rollers - A set of rollers pull the paper in from the tray or feeder and advance the paper when the print head assembly is ready for another pass.  
  2. 2. Paper feed stepper motor - This stepper motor power the rollers to move the paper in the exact increment needed to ensure a continuous image is printed.
  3. 3. Paper tray/feeder - Most inkjet printers have a tray that you load the paper into. Some printers dispense with the standard tray for a feeder instead. The feeder typically snaps open at an angle on the back of the printer, allowing you to place paper in it. Feeders generally do not hold as much paper as a traditional paper tray.
  4. 4. Timing disk - The timing disk which control the paper to move in the exact increment, the small mark on the timing disk will let the printer know how fast feeding the paper to make a clear printing.
  5. 5. Paper Feeding Sensor- This sensor let printer to control the paper feeding machanism.
 Purge Unit
  1. 1. Purge unit -purge unit is the mechanism that cleans and refreshes your print cartridge. It contain a small pupm unit to suck out the ink from the printhead.
  2. 2. Cartridge Parking Unit - a place when the cartridge parking when power off. The device consist of rubber gasket that can close tight to the printhead. there is a pipe connect to purge unit to do the cleaning process.
  3. 3. Waste ink pad - Almost inkjet printer will have a waste ink pad inside the printer. When each time printer on, the printer will have to do a small cleaning process to make sure the print out is clear. The waste ink all is send to the waste ink pad. The printer may need to change the waste ink pad after few thousand pages. the waste ink pad normal is located at the bottom of printer.
 
Printing Mechanism Unit
  1. 1. Timing belt - Long transparent plastic which controls the print head moving left right, the small mark will let printer know where the head positioning and make the accuracy print out.
  2. 2. Print head stepper motor - A stepper motor moves the print head assembly (print head and ink cartridges) back and forth across the paper. When the printer is power off, the printhead normal is park back to the purge unit to avoid ink leakage and also prevent the printhead dry out.
  3. 3. Cartridge Carriage- its hold the printhead and ink cartridge.
  4. 4. Print head - The core of an inkjet printer, the print head contains a series of nozzles that are used to spray drops of ink.
  5. 5. Ink cartridges - Depending on the manufacturer and model of the printer, ink cartridges come in various combinations, such as separate black and color cartridges, color and black in a single cartridge or even a cartridge for each ink color. The cartridges of some inkjet printers include the print head itself.
  6. 6. Belt - A belt is used to attach the print head assembly to the stepper motor.
  7. 7. Stabilizer bar or Carriage holder - The print head assembly uses a stabilizer bar to ensure that movement is precise and controlled.

Other Main Unit
  1. 1. Power supply - While earlier printers often had an external transformer, most printers sold today use a standard power supply that is incorporated into the printer itself.
  2. 2. Control circuitry - A small but sophisticated amount of circuitry is built into the printer to control all the mechanical aspects of operation, as well as decode the information sent to the printer from the computer.
  3. 3. Interface port(s) - Nowadays printer all running the USB port. But parallel port is still used by many old printers.


Printing Result
Printing quality with an inkjet printer is very dependant on the proper inkjet cartridge, and paper quality. Many inkjet printers have the print head built directly into the ink cartridge itself. This is often the most expensive, and fragile, part of the printer (that helps to explain their high replacement costs). These printer like ip1880, ip1980, MP145, MP198, MP245, MX338, MX308, MX318 for canon; D2460, D2560, F380, F4280, F4280 for HP.... If the ink choosing are not suite to the printer, may result in poor print quality(print blurry, smeared, or washed out.) and cause the print cartridge burn and spoil. We Always recomended Maxprint Special formulate taiwan ink for more more vivid and last longer printing.

That's why We Called 'Max' print, Make your printer Last Longer !


Read more...

windows Verifying Malware

>> Monday, June 20, 2011

Removing ‘Windows Verifying Center’ Malware

 This malware doesn’t appear to be more than a few days old based on the results I was getting from Google. It was time for some creative troubleshooting.
Here is what was happening. When he logged onto his computer he was greeted by this:
Then after a few seconds he would be asked for permission to scan his computer.
The first thing I did was to unplug his computer from the Internet.
At this point there was no way to avoid the software. I tried pressing CTRL-ALT-DEL and invoking the Task Manager and I tried pressing Alt-F4 to try and kill the process. I also tried rebooting his computer and bringing it up into safe mode. That didn’t work either as we were greeted by the same screens and same restrictions.
Note: For those that don’t know, Alt-F4, closes the current window or application. It is a legacy keyboard shortcut that, at times, is a good thing to know.
I proceeded to boot his computer up normally, allowed the malware to “scan” his computer and then when it asked for confirmation to “fix” the problem, I was able to close the software and finish booting into Windows by pressing Alt-F4.
I tried pressing the ‘X” in the upper right corner of the above screen but that didn’t work either. Before the client called me he had tried to “register” the software and fortuntaely for him, his bank was able to block the transaction and called him to warn him that this software wasn’t legitimate.
Anyway, once I was able to get into Windows, the software wouldn’t let much happen. No Internet. No CMD window. No MSConfig. I even tried to install MalWareBytes from my USB stick but it would kill that process too. Everytime I tried to run any of these I’d see the following screen:
I’d exit this screen as well using the Alt-F4 key combination..
As you can see from these screenshots, the software looks VERY legitimate.

Removal Instructions

The way I was eventually able to work around the software and remove it was to do the following:
  1. Followed the above steps to bring up the Windows desktop
  2. Started the Windows Control panel
  3. Brought up the user account control panel item and created a new user with a password and administrator rights.
  4. Logged out as the current user and back on as my new user
  5. At this point I was able to load MalWareBytes and update it from this new user account. You can either do this by opening your browser and downloading it or by copying it to a USB drive and putting that drive on the infected computer.
  6. Run a quick scan and clean the items it found from the computer and rebooted
  7. Logged back in as the new user
  8. Ran a full MalWareBytes scan and rebooted

Read more...

Tip Untuk Pengendali Laman Web daripada serangan pengodam

>> Friday, June 17, 2011

Pemantau keselamatan siber, CyberSecurity Malaysia menasihatkan semua pengendali laman web milik organisasi dan kerajaan supaya mengambil langkah proaktif dalam melindungi laman web mereka berikutan serangan penggodam yang dijangka memakan tempoh masa beberapa hari.
Sehubungan itu, Ketua Pegawai Eksekutif CyberSecurity Malaysia, Leftenan Kolonel Datuk Husin Jazri berkata, pihaknya menyediakan tip dan amalan-amalan terbaik untuk melindungi laman web daripada serangan penggodam.Menurutnya, antara tip berkenaan termasuk:
(1) Apakah yang anda perlu tahu mengenai pencacatan laman web?
http://www.mycert.org.my/en/resources/incident_handling/main/main/detail/756/index.html
(2) Langkah-langkah untuk pulih daripada pencerobohan sistem UNIX atau NT:
http://www.auscert.org.au/render.html?it=1974&cid=1920
(3) Senarai semakan pengesanan pencerobohan:
http://zeltser.com/log-management/security-incident-log-review-checklist.pdf
(4)Langkah-langkah untuk mengatasi kelemahan SQL Injections:
http://www.mycert.org.my/en/resources/web_security/main/main/detail/573/index.html
(5) Bagaimana untuk melindungi SQL Injection dalam ASP.NET?
http://msdn.microsoft.com/en-us/library/ms998271.aspx .
(6) ModSecurity
http://www.modsecurity.org/
Sehingga awal pagi Khamis, sebanyak 51 laman web .gov.my digodam menyebabkan 41 daripadanya mengalami gangguan pada tahap yang berbeza, menurut Suruhanjaya Komunikasi dan Multimedia Malaysia (SKMM).
Serangan itu berlaku ekoran satu kenyataan sebuah kumpulan luar negara dikenali “Anonymous” untuk menggodam laman web rasmi kerajaan www.malaysia.gov.my semalam, dengan alasan kononnya kerajaan mengenakan sekatan Internet.
Suruhanjaya itu berkata terdapat cubaan menggodam beberapa laman web termasuk laman webnya sendiri www.skmm.gov.my pada 11.30 malam tadi tetapi gagal.
Menurut SKMM, Pusat Keselamatan Rangkaian suruhanjaya itu bersama beberapa agensi lain, penyedia perkhidmatan dan pakar-pakar telah menjalankan usaha berterusan bagi memantau dan menyekat serangan itu.
Sementara itu, Husin berkata, sekiranya laman web dirosakkan atau mendapati ia berdepan dengan serangan penggodam, hubungi Cyber999 menerusi saluran e-mel di cyber999@cybersecurity.my atau mycert@mycert.org.my atau talian 1-300-88-2999 yang dipantau pada waktu kerja iaitu dari 8.30 pagi hingga 5.30 petang; atau faks 603 89453442, telefon bimbit +60 19 2665850 yang boleh dihubungi sepanjang masa; khidmat pesanan ringkas dengan menaip CYBER999 REPORT ke 15888.
CyberSecurity boleh diakses melalui laman web http://www.mycert.org.my.

Read more...

Masalah-masalah Printer

>> Wednesday, May 4, 2011

Hasil cetakan bergaris atau keluar namun warna pudar Kemungkinan penyebabnya:
• Ada gelembung udara dalam cartridge (kemungkinan boleh disebabkan semasa penyuntikan/pengisian
semula cartridge)
• Print head kemungkinan tersumbat oleh color yang kering (boleh disebabkan kerana jarang dipergunakan)
• Print head rosak/tergores/posisi berubah kerana kerosakan fizikal
• Salah dalam pemasangan cartridge
• Ada yang kehabisan color untuk warna tertentu atau semuanya
• Salah settingan pada komputernya
Rujukan : http://www.forum.kjkm.org
Contoh solution:
• Bersihkan dengan cara melakukan head cleaning selama 2-4 kali untuk mengeluarkan gelembung udara
yang ada di dalam cartridge (baca manual printer sesuai dengan printernya)
• Pasang kembali yakinkan secara benar catridgenya, matikan dan hidupkan kembali untuk pastikan status
cartridge telah berubah.
• Ganti cartridge yang lama/rosak
• Jaga-jaga jangan sampai membuka seal film bahagian bawah walau keluaran bergaris atau tak keluar
sama sekali
• Check semula,sewaktu anda mencetak tidak ada settingan kualiti cetakan draft atau super
ekonomi
• Ganti print head lama atau yang rosak
Hasil cetakan tak keluar sama sekali
Kemungkinan penyebabnya:
• Banyak gelembung udara di dalam cartridge
• Printer dan uzur (tua) atau rosak atau tertutup bahagian print head-nya
Contoh solution:
• Bersihkan dengan cara melakukan head cleaning selama 2-4 kali untuk mengeluarkan gelembung udara
yang ada di dalam cartridge (baca manual printer sesuai dengan printernya)
• Goncang cartridge beberapa kali (3-4) sebelum memasangnya(mabye cartridge beku)
• Jaga-jaga jangan sampai membuka seal film bahagian bawah walau keluaran bergaris atau tak keluar
sama sekali
Printer tak mengenali cartridge yang baru dipasang
Kemungkinan penyebabnya:
• Cartridge tak terpasang dengan benar
• Menyentuh chip kecil pada cartridge dengan tangan atau juga chip tersebut kotor/basah (chip ini mudah
rosak)
• Rosaknya sebagian jalur (rangkaian pada cartridge)
Contoh solution:
• Pasang semula dan pastikan cara pemasangan secara betul catridenya, matikan dan hidupkan kembali
untuk pastikan bahawa status cartridge telah berubah.
• Gunakan kain bersih dan kering untuk membersihkan chip bila chipnya memang kotor
• Cek jalur rangkaiannnya jika ada yang rosak
• Jika memang tak bleh juga diperbaiki beli aje yang baru :sweat:
Setelah dipasang cartridge baru ada peringatan bahwa cartridge yang terpasang tidak asli
Kemungkinan penyebabnya:
• Mesej yang umum dari pengeluar untuk pengguna
Contoh solution:
• Mesej ini boleh abaikan saja jika ada pertanyaan jawab aje “yes” atau ikut je arahan yg sesuai dgn
permintaan, masalah ini tak mempengaruhi kualiti hasil cetakan dengan printer tersebut.
Setelah mengganti Cartridge baru, masih tetap keluar peringatan “Color habis”
Kemungkinan penyebabnya:
• Hal ini boleh disebabkan kerana sewaktu kita mengganti cartridge keadaan printer dalam keadaan mati,
sehingga memory printer masih tetap dalam keadaan sebelumnya “color habis”
Contoh solution:
• Matikan dan hidup kan printer, mulakan proses mencetak.

Read more...

Tutorial Membuat CD Auto Installer XP dengan nlite

Image and video hosting by bismillahgratis.blogspot.com
Berhubung bahasa kompeniku pas2an jadi ya mencoba coba buat tutorial   berbahasa indonesia atau menyadur tepatnya, soalnya nyomot sana sini  juga.  Semoga aja tetep bermanfaat ….
Berdasarkan pengalamanku menggunakan nLite ini  huehuehue :P
Master windows XP Professional yang kurang lebih berisi 500mb  dapat dimampatkan atau dikuruskan menjadi 200mb saja.
 Kinerja windows pun menjadi lebih cepat (tergantung dari komponen yang  dihilangkan),
dan  dapat berjalan mulus pada komputer P3 450mhz. Pada kasus  juragan  teknisi Djnet1,2,3 dan Djnet4 kalee.... malah pada sebagian komputernya   terdapat komponen komputer P3
dengan spesifikasi lebih rendah lagi dan  dipastikan tetap berjalan mulus


Ada beberapa alat yang harus disiapkan, antara lain:

* nLite,boleh di donwlod disini

* .Net Framework 2.0, donwlod disini

* CD Master Windows XP

Setelah semuanya siap maka pertama tama yang harus dilakukan adalah menginstall .Net Framework 2.0 dan nLitenya.
Setelah dilakukan install maka nLitenya bisa dijalankan, kemudian ikuti langkah2  berikut ini:


Langsung aja ke TKP......

1. Setelah DOWNLOAD Nlite,silahkan sobat blogger menginstalnya,

http://www.aqsha-a.co.cc/wp-content/uploads/2010/04/image32.png

2. setelah menginstal silahkan Buka Nlite-nya


1

3. Kemudian browse ke folder XP project :

2

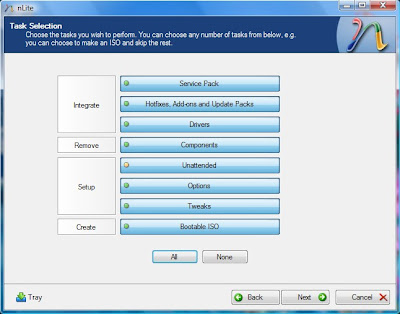
4. Software akan mendeteksi produk Windows, versi dan ukuran CD. Kita bisa membandingkan ukuran awal, dengan hasil akhir yang didapat. Setelah itu, pilih task yang dikehendaki. Jika baru mulai, pilihlah all. Untuk melihat seluruh step.

3


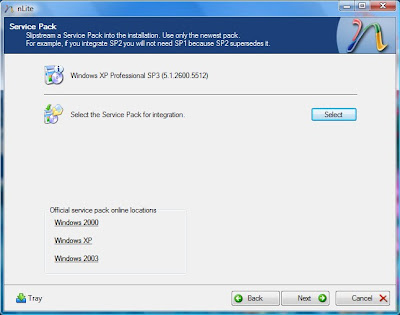
5. Step selanjutnya, integrasikan service pack 3, jika anda menggunakan CD SP2. Tunggu proses pengintegrasian sampai selesai.

4


6. Masukan hotfix, addons maupun update packs yang sudah disiapkan sebelumnya. Tunggu sampai pengintegrasian selesai. Setelah itu next dan masukan driver-driver yang diperlukan untuk penginstalan OS di komputer anda.

6


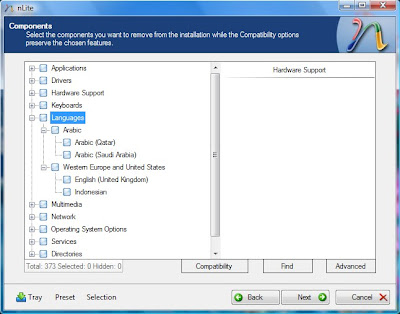
7. Step selanjutnya adalah proses 'pembersihan', anda bisa menyeleksi komponen yang tidak dikehendaki, antara lain language pack, anda cukup menyisakan bahasa yang perlu saja, seperti Arabic, English maupun Indonesia. Hasilnya cukup lumayan, bisa menghemat 100an MB.

7

8. Tahapan berikut adalah yang paling penting, yaitu unattended page. Anda diminta mengisi segala data yang diperlukan selama penginstalan.

8

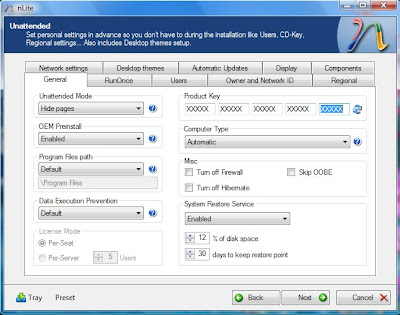
9. Selanjutnya kita telah sampai pada tahap Unattended page, dimana kita diminta memasukan seluruh data yang diperlukan pada saat penginstalan, antara lain :


9


  • Product Key : masukan 20 digit nomor serial untuk windows anda.
  • Unattended mode : pilihan kita untuk memakai mode yang dikehendaki, antara lain :
  1. Provide default : Setup menyediakan default answer untuk user yang bisa dirubah saat penginstalan. Pilih ini jika CD anda juga dipakai untuk orang lain.
  2. Fully automated : Jawaban disusun penuh, tidak ada interaksi selama penginstalan. Tapi jika jawaban yang anda buat salah, akan timbul error. Pilih ini, jika anda menginginkan hand off selama proses berlangsung.
  3. Hide Pages : Prinsipnya sama dengan provide default, hanya pada mode ini, setup tidak memunculkan user interface. Jika kita mengisi beberapa jawaban, halaman tersebut akan muncul dan kita bisa mengeditnya. Skenario ini dipilih jika user menghendaki penggunaan password pada Administrator password.
  4. Read only : Jika kita menghendaki seluruh jawaban default, dan memaksa user untuk mengisi hanya pada satu halaman yang dikehendaki.
  5. GUI-Attend : Jika dikehendaki jawaban yang diberikan muncul pada saat akhir penginstalan.
  6. Prompt Repair : Mode ini memunculkan option untuk repair, dan berakibat akan mendisable beberapa file jawaban dan system akan dipaksa pada Hide pages.
  • Pada Tab run once, anda bisa mengisi basic command untuk slipstreaming software. Penginstalan software secara auto setelah windows selesai diinstal. Hal ini akan dibahas pada posting tersendiri.
  • Pada Tab User, isilah User name, Full name, Description maupun Password jika anda menginginkan.Jika semua sudah yakin benar, klik next.
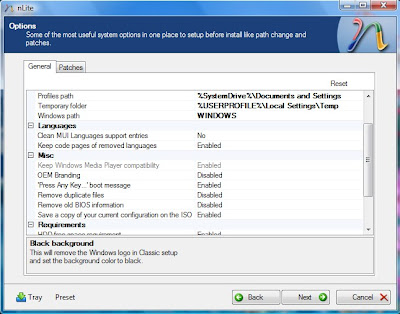
  • Selanjutnya ada beberapa option dan patch yang bisa anda pilih. Biarkan default jika anda tidak yakin.
10

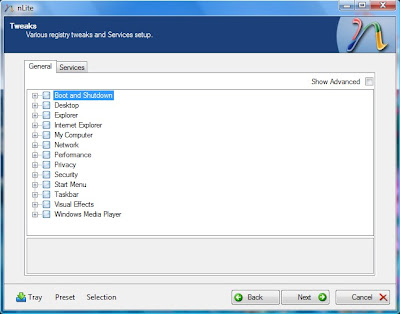
10. Kemudian lakukan tweaks pada XP anda, lakukan setting yang anda senangi, anda bisa pelajari tentang Tweak XP lebih dulu.

12
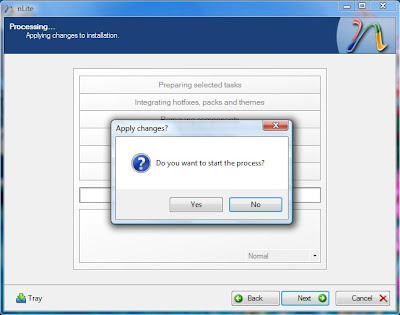
  • Jika semua siap, tahap selanjutnya adalah processing dari semua tahap. Tungggu beberapa saat, nlite akan bekerja memenuhi keinginan anda.
13
  • Jika proses sudah selesai, tahap akhir proyek kita di depan mata. Lakukan burning CD kita ke format bootable. Jangan khawatir, nlite siap membantu anda. Untuk lebih meyakinkan, bakarlah CD anda ke format ISO (CD image) sehingga anda dapat mengetesnya di Virtual PC. Jika semua lancar, baru membakarnya di kepingan CD.
14


Setelah kita tahu bagaimana menggunakan fasilitas nlite sampai pada proses burning, kali ini saya akan menambahkan beberapa hal penting yang berkaitan dengan slip streaming software melalui run once.

Pada halaman ke-2, saya menjelaskan adanya input command pada Tab run once yang berguna untuk melakukan penginstalan otomatis software pada akhir proses penginstalan Windows. Lalu apakah cukup hanya demikian? Ternyata tidak. Kita harus mempersiapkan setup installer seluruh software yang diinginkan dan ditempatkan pada satu folder khusus di CD installer kita.

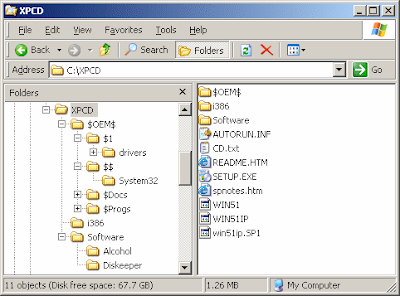
Untuk lebih jelasnya, perhatikan root folder berikut :

14

Buat satu folder khusus di folder XPCD dan beri nama $OEM$. Kemudian buat dua folder dengan nama masing-masing $1 dan $$. Buat folder dengan nama Install dan drivers pada folder $1.
15

Dari gambar bisa dilihat bahwa folder $OEM$ paralel dengan folder i386. Untuk lebih jelasnya kira-kira begini :
  • Pada saat proses awal : layoutnya adalah C:\XPCD\$OEM$\$1\Install\
  • Ketika burning ke CD menjadi : X(CD rom drive) :\$OEM$\$1\Install\
  • Ketika dicopy ke hard disk pada saat setup menjadi : C:\Install\
Kemudian, tempatkan seluruh setup installer software di folder Install dan driver di folder Drivers. Jelas kan? Maka pada tab run once misalnya kita akan memasukan text command berikut :

@start /wait %systemdrive%\Install\Applications\wrar371.exe /s 
Ini berarti di drive C:\Install\ ada folder Applications berisi file wrar371.exe sedangkan /s berarti diinstal secara silent (tanpa ada interaksi). Sehingga, anda harus tahu juga bagaimana membuat silent installer, karena setiap jenis setup baik itu file yang berekstensi .msi, .exe, ino setup maupun lainnya mempunyai karakteristik yang berbeda. Berikut contoh input pada tab run once :
@echo off
TITLE Windows XP SP2 Agus Studio 2005 Auto Installer
@ECHO Visit http://agusstudio2005.blogspot.com/ for support guide.
@ECHO Please wait another 15 minutes for installing some patch and hotfix...
@ECHO 1. Installing Dotnet Framework 1.1
@ECHO    Please Wait ...
@start /wait %systemdrive%Install\Applications\Framework1\dotnetfx.exe /q:a /c:"install.exe /q"
@start /wait %systemdrive%Install\Applications\Framework1\NDP1.1sp1-KB867460-X86.exe /q
@start /wait %systemdrive%Install\Applications\Framework1\NDP1.1sp1-KB886903-X86.exe /q
@ECHO.
@ECHO 2. Installing DotNet Framework 2
@ECHO    Please wait ...
@start /wait %systemdrive%\Install\Applications\Framework2\dotnetfx.exe /q:a /c:"install.exe /q"
@start /wait %systemdrive%\Install\Applications\Framework2\NDP20-KB917283-X86.exe /q
@start /wait %systemdrive%\Install\Applications\Framework2\NDP20-KB922770-X86.exe /q
@ECHO 3. Installing WinRAR 3.71 Full Version
@ECHO    Please wait...
@start /wait %systemdrive%\Install\Applications\wrar371.exe /s
@ECHO.
@ECHO Restarting the PC in 1 minute...
@shutdown.exe -r -f -t 60 -c "Windows XP SP2 wiil be restart in 1 menit ..."
EXIT 
Dari contoh ini kita bisa melihat bahwa dari ke-8 software yang akan diinstal ditempatkan di folder Install/Applications. Dan cara ini memerlukan pengetahuan khusus dalam membuat kode atau switch untuk deployment software, silakan anda pelajari sendiri.

Jika anda merasa repot untuk mempelajarinya satu persatu, cara termudah untuk menginstal software secara auto adalah dengan mendownload software yang sudah siap dengan ekstensi .cab, kemudian anda masukan ke dalam add ons yang diminta oleh nlite (lihat gambar ke-5 postingan I). Hanya saja kita hanya bisa memilih software tertentu saja. Koleksi add ons yang cukup lengkap ada Win Add ons.


 SELAMAT MENCOBA...!

Read more...

SisLog

>> Tuesday, May 3, 2011

Sistem Rekod Log Penggunaan Komputer (SisLog)

Program ini direka khas buat mereka yang bekerja di SEKOLAH

Muat turun di sini Terima kasih kepada pembangun sistem ini.

Pengenalan Sistem Rekod Log Penggunaan Komputer (SisLog)
Sistem ini membantu merekod log penggunaan setiap komputer yang disambungkan melalui rangkaian (network). Sistem ini juga menggantikan “BUKU LOG PENGGUNAAN KOMPUTER” yang berada di Makmal-makmal komputer, Pusat Akses dan ditempat lain yang mempunyai rangkaian komputer setempat (LAN) mahupun (WAN).


Kelebihan Sistem SisLog?

- Dapat merekod log penggunaan komputer dengan lebih efisyen.
- Dapat menganalisis data log secara professional.
- Dapat menjana laporan harian, bulanan dan juga tahunan dengan lebih terperinci.
- Dapat menjimatkan masa serta kos untuk membuat “BUKU LOG” yang berada di makmal komputer.
- Sejajar dengan hasrat kerajaan untuk mempraktikkan budaya celik IT dan seterusnya dapat meningkatkan mutu kerja seharian.

Platfom
Sistem ini ditulis diatas platfom Microsoft Windows, jadi hanya platfom Windows sahaja yang boleh gunapakai sistem ini. Kepada mereka yang menggunakan Mac OS, Linux, dan selain dari itu minta maafla yer. Mungkin akan datang akan ada versi platfom sedemikian pulak. Insyaallah..

Keperluan Minima Sistem

- Microsoft Windows 98 ke atas.
- Microsoft Office 2000 ke atas.
- 64 MB RAM ke atas.

Read more...

Lock & Unlock HDD

>> Sunday, April 10, 2011

Disk drives are pieces of hardware that contain a magnetic disk that can retain electronic information such as computer documents, mP3s and other files that you would use in your computer. If you have a computer that other people access or just don't feel safe leaving your information exposed to the world, you can lock any or all of your disk drives to protect the sensitive information stored on them. You can only open this lock with the unique password that you choose.
Difficulty:
Easy

Instructions

things you'll need:

  • Disk drive lock program
  1. Using a Drive Lock Program
    • 1 Download a disk drive lock program such as Advanced Drive Protector and Easy Disk Drive Safeguard. (See Resources.) You can use a trial version to see if you like it or you can just buy the full version.
    • 2 Install the disk drive lock software onto your computer by following the installation instructions.
    • 3 Click on the "Start" menu and choose "All Programs." Select the disk drive lock program that you installed and launch it.
    • 4 Browse through all of the displayed drives and select the ones you want to lock. To select a drive, just click on the check box next to each drive.
    • 5 Set the password you want to use and save the changes. Use an easy to remember password that will not be guessed by anyone else.
How to Erase a Locked Hard Drive
Hard drive
When a hard drive is locked it may prevent software from having direct disk access to the drive. Sometimes it's easier to just erase the locked drive then try to unlock it. In order to completely erase a locked hard drive, you will need a piece of software included in the "The Ultimate Boot CD" called "Derek's Boot Nuke." The software is completely free to download and use.

Difficulty:
Moderately Easy

Instructions
things you'll need:
  • The Ultimate Boot CD
  • Power ISO or Magic ISO
  • Blank CD
    • 1 Download the ISO version of The Ultimate Boot CD (See "Resources" for download link).
    • 2 Use a free ISO program such as "Power ISO" or "Magic ISO Maker" to burn the ISO file to a CD.
    • 3 Insert the CD and restart your computer.
    • 4 Press "Enter" to boot The Ultimate Boot CD.
    • 5 Select "Hard Disk Tools," then "Wiping Options" then "Derek's Boot Nuke."
    • 6 Select the hard drive you wish to erase by using the

Read more...

Perniagaan Prepaid Terbaru!

>> Tuesday, January 18, 2011

CARA MUDAH UNTUK


DAPAT BANYAK DUIT?


MUSTAHIL. Tapi Ada Cara Untuk Gunakan Benda Yang Anda Selalu Guna Untuk Buat Duit Tanpa Henti Walaupun Anda Dah Berhenti

Salam sejahtera saya ucapkan kepada anda.
Terima kasih kerana melayari laman web saya. Jika anda pernah terfikir untuk masuk program buat duit dengan top-up, anda perlu membaca mesej ini. Ianya telah mengubah hidup saya dan tidak mustahil, mungkin anda juga.
Saya telah mencuba pelbagai “peluang perniagaan" dan kebanyakannya menipu. Mereka menjanjikan durian runtuh tapi yang saya dapat durian runtuh yang basi. Tak berguna langsung apa yang mereka berikan kepada saya.
Mereka cakap saya perlu sponsor, pergi sana sini dan kata setiap kali saya berhadapan dengan “tidak” daripada prospek saya, saya semakin dekat dengan jualan.
Mereka tipu. Bukan semuanya tapi kebanyakannya. Tapi akhirnya saya fed up dan cuba mencari satu peluang yang betul-betul boleh membantu saya. Saya tidak tahu berapa banyak telah saya habiskan dalam pencarian itu (terlalu banyak sampai tak nak tengok semuanya!) tapi saya tetap juga cari.
Hari ini saya ingin bercerita tentang program yang telah menarik saya keluar daripada masalah kewangan.
Program ini ialah perniagaan KAD SIM prepaid WOW-ToneExcel. Tapi sebelum anda kata, "Ah, jual top-up lagi", anda silap. Ini bukan program jual prepaid atau top-up.
Ini adalah program baru daripada syarikat ToneExcel dengan kerjasama TuneTalk yang dipelopori oleh Jason Lo dan disokong oleh syarikat gergasi Tune Group yang juga memiliki AirAsia (Tune Air)


Dengan menyertai program ini, anda juga akan mendapat perlindungan insurans sebanyak RM100,000 yang disediakan oleh Maybank eTiQa dan tiket penerbangan percuma dari AirAsia.

Perniagaan Kad SIM WOW-ToneExcel ini kekuatannya datang daripada betapa mudahnya mereka boleh membeli top-up di mana saja. Lebih tepat mereka tidak perlu membeli top-up daripada anda.
Mereka boleh pergi ke mana-mana stesen ePay, 7Eleven, Maybank2u, CIMB Clicks, E-Banking EON Bank dan RHB Bank serta segala tempat yang memiliki e-Pay.

Ya, anda tidak perlu susah-susah untuk menjual top-up kepada mereka dan anda akan mendapat pendapatan pasif setiap kali mereka top up kad SIM yang anda jual kepada mereka.
Jika anda fikir anda perlu menukar nombor telefon untuk menggunakan kad SIM ini, anda silap. Anda boleh guna nombor lama anda tak kira sama ada nombor lama tu adalah prepaid atau postpaid.
Sama juga dengan kawan-kawan anda. Mereka boleh guna kad SIM yang anda jual kepada mereka dan masih lagi menggunakan nombor yang sama.
Jadi, tidak ada masalah untuk anda dan kawan-kawan anda untuk bergayut dan bersms di handphone mereka sambil mendapat duit pada masa yang sama.
Bagaimana pula dengan potensinya?
Well... seperti yang yang saya katakan, tidaklah banyak mana. Tapi ada benda menarik yang saya ingin tunjukkan kepada anda. Minimum top-up bulanan untuk layak dapat komisyen dalam program ini hanya RM20 sahaja. Tapi kita berdua tahu orang guna lebih daripada itu sebulan.
RM10 habis sekejap je. Terutama sekali kalau jenis yang suka call orang. Berikut adalah komisyen yang anda boleh dapat:

Pendapatan dari program ini ada tiga level. Pertama, 6%, kedua, 3% dan ketiga, 11%. Jadi kalau anda sendiri pujuk 10 orang, ianya akan menjadi seperti ini, kita anggap setiap orang gunakan prepaid RM30 sebulan:
RM30 x 6% x 10 orang = RM18.00 komisyen anda di level 1
Sedikit kan? Kalau setiap orang yang anda ajak pun ajak 10 orang, ianya akan jadi begini:
RM30 x 3% x 100 orang = RM90.00 komisyen anda di level 2
Woops. RM108... SEBULAN. Tapi itu MASIH LAGI sedikit. Bagaimana kalau setiap orang di atas pun ajak seramai 10 orang? Jawabnya anda akan mendapat:
RM30 x 11% x 1000 orang = RM3300.00 komisyen anda di level 3
Campur semua sekali anda dapat RM3408.00 sebulan!!!
Ooh... dalam sebulan macam-macam saya boleh buat dengan duit sebanyak itu. Saya pasti anda juga ada macam-macam yang nak beli kalau dapat duit tu.
Itu hanyalah contoh mudah dengan penggunaan prepaid cuma RM30. Saya sendiri guna lebih daripada RM70 sebulan. Mungkin anda juga guna banyak seperti saya.
Saya tak tahu tapi ramai orang di luar sana yang gian berSMS dengan kawan-kawan, bergosip dan berborak sehingga larut pagi.
Bayaran komisyen pula akan dilakukan pada setiap 21 hari bulan terus ke akaun bank anda dengan syarat anda dah ada komisyen minima RM30.
Bayangkan anda tak perlu susah payah top-upkan untuk mereka tapi anda masih lagi boleh mendapat komisyen. Duduk di rumah, tengok TV tapi duit masuk ke kantung anda setiap masa.
Mudah bukan?
Bagaimana pula dengan cajnya? Adakah lebih tinggi daripada telco lain? Tidak sama sekali...
Kadar panggilan kami ialah 32 sen seminit ke semua rangkaian. Yang lain-lain menawarkan kadar panggilan sebanyak 36 sen hingga 39 sen seminit.
INGAT! Anda tidak perlu menukar nombor anda untuk menggunakan TuneTalk ini. Tidak sama sekali. Mari kita lihat apa yang akan anda dapat jika menyertai program ini:
Laman web untuk anda menaja secara online atau SMS
www.bisnesprepaid.com/username anda
Kad SIM WOW-ToneExcel dengan kredit RM38
Insuran RM100 ribu dari eTiQa
Tiket penerbangan percuma dari AirAsia
Pendapatan lumayan dan berterusan setiap bulan

Persoalan akan rugi tidak timbul langsung jika anda menggunakan prepaid WOW-ToneExcel. Ingin mencuba bagaimana program ini boleh mengubah hidup anda?
Hanya tekan butang join di bawah untuk DAFTAR PERCUMA dulu dan saya akan membantu anda menjadi seorang yang berduit. Saya pernah susah dan saya tidak mahu anda susah seperti saya.

Setiap kali kawan anda call orang, mereka akan memberi anda duit melalui caj mereka. Anda tidak perlu lagi berkerut kepala fikir kenapa kredit anda cepat sangat habis kerana anda sudah mempunyai modal sampingan untuk mendapatkan topup.
Peluang ini masih lagi tidak diketahui ramai. Tapi apabila ramai dah tahu, anda mungkin terpaksa bersaing dengan ramai orang. Cuba dapatkan sebelum itu berlaku.
Saya harap anda juga berjaya,


P.S Success waits for no one – hanya mereka yang sanggup mengambilnya sahaja yang akan berjaya

Read more...

Solve Problem Windows

>> Wednesday, December 15, 2010

Solutions To Windows Network Connection Problems

Here I will lay out four easy solutions you can try to get your Internet access back. I will give instructions for Windows XP, Vista, and Windows 7.

Check Your Hosts File

Windows can use the hosts file to set IP addresses to particular domains. This means though that it can be used to redirect or effectively cut off your Internet access.
When I need to troubleshoot an Internet connection, this is usually the first place I look.
To view the file in Windows XP, just open up Notepad and go to File->Open. Then, navigate to your C drive, then to the “Windows” Folder, then “System32” folder, then “drivers” folder, then “etc” folder and finally, open the file named “hosts“.
You may have to change where it says “Text Documents” to “All Files” to see the hosts file.
network connection problems
After you have the file open, it should look something like this:
network connection problems
It should only have the heading stuff and maybe the line designating the localhost. Anything else should be deleted.
The instructions are the same for Vista and Windows 7, only instead of just opening Notepad, you have to right click the Notepad icon and choose to “Run as administrator” to edit the file.

Check Your TCP/IP Settings

Another issue may be that your TCP/IP settings were altered in some way.
For XP, got to Control Panel and then Network Connections.
In Windows Vista/7, go to the Control Panel and then the Network and Sharing Center. In 7, click on “change adapter settings.” In Vista, click on “manage network connections“.
In all versions of Windows, after you get to the places designated above, right click the device giving you trouble, either the Wireless card or Ethernet card. Then select “Properties.”
Something looking like the following window should pop up.
fix windows network connection issues
Click on Internet Protocol Version 6 and then hit “Properties“. You should see something like the following.
fix network connection problems
If either the IP or DNS server address are not set to automatic, set them to be automatic.
Repeat this for Internet Protocol Version 4.

Reset Your TCP/IP Manually

Sometimes, you may just need to reset your TCP/IP. This can easily be done at the command line in Windows.
For Windows XP, go to Start->Run. Type “cmd” and press enter. A command window should pop up. Then type “netsh int ip reset c:\resetlog.txt” and press enter. You will then have to restart your computer.
For Windows Vista/7, you have to run the Command Prompt as an administrator. To do that, just type “cmd” in your start menu’s search bar. Right click the “cmd” icon that should come up and select “Run as administrator.” Then type the same as indicated above, press enter, and restart.

Reset Your Winsock Manually

Winsock, short for Windows Socket API, is how Windows handles network services. A reset of this may fix a network problem.
Resetting your Winsock is similar to resetting TCP/IP. Open a Command Prompt as laid out above for your version of Windows and type “netsh winsock reset“. Then press enter and restart your computer.
Sometimes even these steps will not fix a faulty connection. If that’s the case, you can try googling the exact problem or contacting someone with network experience.
If you know any other quick solutions to fixing network connection problems, please lets us know in the comments below.

Shutdown PC with command prompt

Shutdown Local Machine

This only takes a couple of keystrokes. Type the code below and hit OK:
shutdown -s
“shutdown” tells the computer what command we want to execute and the “-s” switch tells it what to do, which is to shutdown!

Specify Time

shutdown -s -t 60
Now we have added the “-t” switch and a variable, which in this case is “60″. This number is the number of seconds before the computer is shutdown. A dialog will open and display a count down timer!

Give Us Some Info!

shutdown -s -t 120 -c "You better finish, because I shut you down foo!"
The “-c” switch will allow you to give the user some information for the reason of the shutdown.

Shutdown A Remote Computer

shutdown -s -m \\desktop -t 45
I really like this one! The “-m” switch will allow you to shutdown a remote machine, in this case, a computer named “desktop”. For this to work, you must have administrative access to the computer! To see of you do, hit Windows Key + R then type the computer’s name, i.e.:
\\desktop
If you can connect to it, you will be asked to log into the machine with a user name and password. Once confirmed, a window will open displaying the directories available to you. Now you know you can shut it down remotely.

Cancel Shutdown

Let’s say that you need to cancel a shutdown in progress. Go to the computer in question, hit Windows Key + R then type command below:
shutdown -a

Install Windows XP on Asus Eee PC

Summary
  1. Introduction
  2. What do you need
  3. Creating a bootable USB stick (or hdd)
  4. Installing Windows XP from the USB stick
  5. Installing ASUS Eee PC drivers
  6. ASUS Eee PC Tips and Tricks (hardware & software)
  7. Article references
1. Introduction
In December 2008 i bought online with my credit card (thanks to ePayment) four Asus Eee PCs 4G Surf (two white and two black models) from PCfun. I liked the white ones better so i kept one for myself and the rest i gave them to the family members. Being my first gadget, i was and i'm still very excited about its features. All models come with a friendly linux distro from which you can connect to the Internet very fast. When i got my Eee PC out of the box it took me about 1 to 2 minutes at most to connect to a free wireless network and surf the net. Sweet! I downloaded an MP3 and listened to it just to check the sound and the incorporated speakers from the LCD panel.
I like Linux, but running it as a desktop has no use to me, so i quickly decided to install Windows XP. Let's see how i did it.
PS: most of the tips here might also work with any other desktop or notebook as well.
2. What do you need
  • your desktop computer (this is NOT your ASUS Eee PC)
  • one image or a cd with Windows XP
  • a stick (1Gb is fine) or a USB hdd - make sure you don't have partitions on it or you may loose them in the process
  • USB Multiboot software (choose one of the following download locations: CD Forum download, BootLand download, Siginet download)
  • your ASUS Eee PC later
3. Creating a bootable USB stick or USB hdd
If you are in hurry or know what you are doing but forgot some steps, check out this great video tutorial (go to 02:45 min to skip the chit-chat):
  • Extract USB Multiboot and browse USB_MultiBoot_10/ folder and then run USB_MultiBoot_10.cmd
  • Press any key
  • Type H and press ENTER
  • HP USB Disk Storage Format Tool screen will appear. If this does not find your USB device you can format it manually from Windows and press 'Close' or you can go back and try option P. Check 'Quick format' and press 'Start'
  • In the multiple option screen press 0 and hit enter to toggle between USB Stick and USB harddisk. This is very important because the Windows XP will not install proper if you have a USB harddisk like this one. The 'USB Stick' medium is selected by default.
  • Type 1 and press ENTER and then select the Windows XP source (this is the CD or a path on the HDD where your have your XP installation files)
  • If you get a message about 'winnt.sif' press 'YES'
  • in the 'Unattended Install' screen fill the fields with values (also with your serial). If you fill the fields now you will not need to complete them later in the Windows XP installation screen. When you're done press 'Cancel (no changes)'
  • Type 2 and press ENTER and select your USB device
  • Type 3 and press ENTER, you will see some files copying on the USB drive. During this you might be asked 'Copy XP and extra sources on the USB?' and press 'Yes'. Now wait couple of minutes (this depends on your system and USB drive speed). You will also get the message 'FileCopy to USB-Drive is Ready - OK - Success' and press YES (Make USB-stick in XP Setup to be Preferred Boot Drive U:)
  • All done just press any key
4. Installing Windows XP from the USB stick
  • Connect the USB drive to your ASUS Eee PC
  • Start your netbook and in the first screen press F2 to enter BIOS.
  • In the BIOS screen go to 'Advanced' tab and change 'OS Installation' to 'Start'.
  • Next in the 'Boot' tab under 'Hard Disk Drives' select the USB drive as the 1st Drive
  • Also in the 'Boot' tab but under 'Boot Device Priority' section you should see the USB drive as the 1st Boot Device
  • 'Exit & Save Changes' made in the BIOS.
The netbook will reboot. You wait couple of seconds and see the following screen:
1. Begin TXT Mode Setup Windows XP, Never unplug USB Drive Until Logon
2. and 3. Continue with GUI Mode Setup Windows XP + Start XP from HD 1
4. Start GRUB4DOS Menu - DOS FPY IMAGES + Linux + XP Rec Cons + VISTA Attended Setup XP, Never unplug USB Drive Until After Logon
You will select 1 and press ENTER. This will start the standard Windows XP setup install (format quick NTFS, create partitions etc). After the setup finished to copy all the files needed it will reboot. Now select 2 and 3 (it's a single tab option). This will continue your installation (the classic graphical Windows install). This might take 20 to 40 minutes. When this is done the netbook will reboot (DO NOT UNPLUG THE USB DEVICE YET!), select the 4th option then the last 'Start/Boot Windows XP from HDD'.
5. Installing ASUS Eee PC drivers
Now you are logged in in Windows XP but you can't do anything because you need the Asus EEPC drivers which can be found on your CD that is shipped with your Asus package. If you don't have the CD then download the drivers from the following locations: RapidShare.de , MegaUpload.com . You will need to unrar the archive and copy it to the stick (create a folder like asuseeepc_drivers/). This folder will contain the following subfolders: ACPI, Audio, Chipset, LAN, Touchpad, vga, Wireless. I suggest you first install the ACPI and Chipset drivers and then the rest. Try to locate the .exe that triggers the installation to start.
6. ASUS Eee PC Tips and Tricks
a. Hardware
There is a big difference between the white and the black models of ASUS Eee PC 4G Surf. The black model Eee PC 4G SURF (4GS-PK008) has a hatch (turn it upside down and you will see it) that allows you to comfortable change the RAM. The white model Eee PC 4G SURF (4GS-W010) lacks of this ability and you will have to disassemble the netbook to upgrade it.
My ASUS Eee PC 4G Surf came with 512Mb of RAM memory and i've succesfuly upgraded it to 2Gb. If you want to upgrade it follow this nice video tutorial.
My ASUS Eee PC 4G Surf came with a solid state HDD with the capacity of 4Gb (this is the internal harddisk). After you install Windows XP you will have around 3 to 2.5 GB left. You can use an external USB drive as a secondary partition and install software, play games, etc. It has to be an USB device with resonable access speed.
If you find browsing with the Touch Pad hard, then i may suggest you go buy the following Microsoft Optical Mouse 500 which i tested and it's tiny, it also has a short cable.
b. Software
I recommend using Windows XP on the ASUS Eee PC with the following settings: System Restore OFF, System Properties -> Advanced tab -> Performance -> Settings -> Visual Effects set to 'Adjust for best performance', here also on the Advanced tab -> Virtual memory change 128 Mb and maximum 256 Mb if you HAD a memory upgrade on the netbook!
Go to Start -> Cmd and in the command prompt type sfc.exe /purgecache. This command does magic, i had 780 mb free space, and after this command i had about 1Gb.
To save space go to C:\WINDOWS\Driver Cache\i386 and delete all the files. You can do the same with the files and folders from C:\WINDOWS\Downloaded Installations when you're done installing software on your Asus Eee PC. Eg. If you install Dreamweaver 8 you will probabil find there a folder called Macromedia Dreamweaver 8 with the main .exe installer and some other files.
Make sure you disabled the system restore from My Computer -> System Restore tab
I was able to run Heroes3 Complete series directly from an external USB device. In the game you will have a small scroll on the bottom of the screen but that will not bother your on this kind of static games. I also played this game wireless with other ASUS Eee PC (now that's a dream come true!)
I was able to run Microsoft Virtual PC 2007 (download here) being installed on C: and running the .vhd (663Mb) and .vmc (12kb) directly from stick. I installed Windows 98SE, mounted Hopkins FBI game and succesfully played it.
I have succesfuly played Starcraft BroodWar on my ASUS Eee PC. I ran it directly from an attached USB stick, also played on BattleNet dozens of games. If already bought Starcraft but want a light version, download this one (100mb) from theabyss.eu.
When you are watching movies on Youtube with Firefox it is recommended to go in Full-Screen mode by pressing F11 or go to 'View' -> 'Full Screen'
If you want to read Word, Excel or Powerpoint files on your Asus Eee PC, download the following free applications from Microsoft's site: Microsoft Word Viewer 2003, Microsoft Excel Viewer 2003, Microsoft PowerPoint Viewer 2003. Note that you can only read, not write! For that you need the Microsoft Office CD or iso.
c. General
Never lift the Eee PC by the display panel
Fully charge the battery before first use and whenever it is depleted to prolong battery life. Be aware that it takes much longer to charge the battery when the Eee PC is in use.
On the lower right of your Eee PC keyboard you will see four LED indicators: Power indicator, Battery Charge Indicator, Solid State Disk (SSD) indicator and Wireless indicator. When the Battery Charge Indicator blinks that means that the battery is less than 10% and AC power is not connected.
It is actually not recommended to use your Eee PC on soft surfaces as beds or sofas because it blocks the vents and the bottom of the netbook can get hot. For example if you let it in your bed and you are watching a movie, you might hear a little noise of fans increasing the speed of ventilation - this is normal.
If you want to use you Eee PC with a projector you can use the 15-pin D-sub monitor port, located on the right side, which supports standard VGA devices.
Your Eee Pc has three USB 2.0 slots and 1 memory card slot. This will allow you to attach removable devices such:
  • USB mouse
  • USB external optical disk drive
  • USB external hard disk drive
  • USB flash memory disk
  • MMC (Multimedia Card)
  • MMC Plus
  • RS-MMC (Reduced Size) (with MMC adapter)
  • SD (Secure Digital)
  • MiniSD (with SD adapter)
  • microSD
  • SD adapter
References
  1. Install XP from USB post on BootLand
  2. Installing Windows XP on a Netbook Via USB (Acer Aspire One)
  3. Asus Eee PC 4GB RAM Installation
  4. i64X.com - nLite Windows XP Install on Asus Eee PC

RAID/SATA SETUP WITH WINXP

There is 3 part of the guide :
Slipsteam the RAID/SATA drivers to the XP Setup and create an updated driver setup disc

! I would recommend that if possible use a CD-RW for your work unless of course you don't mind throwing a CD in case something mess up !

! As to simplify most of the errors that i get through PM, I recommend you to use the vanilla version of Windows XP aka clean setup itself without slipstreams. Avoid any "D3vil SP3 Edition" or such. This is due to the fact that some of these CD might have already been slipstreamed with drivers before and the tools listed here might not recognise the previous slipstreamer and mess up the CD. !

There is an increasing amount of thread on the matter and wish that i could be of some help and solve it easy way. I dare not put this in the Guide section so hopefully if its not appropriate here too, Mods please delete the thread or move it elsewhere. Thanks.

Opening :
Even with the existance of Windows Vista, XP nonetheless is still the choice of OS for a lot of people for now. But because of how old XP is to date and with the emerging of new technologies, the original drivers that came with the XP Setup itself is almost obsolete.

To cut the crap short, laptop doesn't have a floppy drive and XP is unable to load SATA/RAID drivers from another location besides floppy. Of course, not all laptop BIOSes can enable native SATA to emulate PATA hence the existance of this guide. So the only ways to install XP on your ub3r new laptop that runs SATA HDD would be to update the driver database in XP Setup itself.

Tools needed :
  • Windows XP Setup CD
  • DriverPack
  • CDIMAGE GUI (http://unattended.msfn.org/files/global/CDIMAGE_GUI.EXE)(Copy and paste link in new window)
  • CD/DVD Burner to burn CD
How-to :
First of all, copy the contents of your CD to a working path, in this case i'll use C:\WINXP

Download DriverPack BASE from the link above as well as DriverPack MassStorage. Extract the BASE pack into a new folder and put the MassStorage pack you downloaded into the DriverPacks folder.

Run DriverPack...

user posted image

Select "disc" and choose "Browse". Browse the folder which you copied from the CD earlier and in this case it would be my C:\WINXP.

If the setting is grey out like the image below :

user posted image

The solution : DO NOT extract the downloaded files into DriverPacks folder. Leave intact as is (i.e. copy that archive into DriverPacks folder). The DPs_BASE will automatically do the extraction. See the image below :

QUOTE(SubKi||er)
..put the MassStorage pack you downloaded into the DriverPacks folder.


user posted image

If you do it right, you can have the selection as below rclxms.gif :

user posted image

Credits: keyz

Execute DPs_BASE.exe and use the installation platform selected to disc. Browse to the XP working directory you copied from the CD just now, in my case C:\WINXP earlier. Select the DriverPacks list that will appear after loading the working directory and put a check mark on DriverPack MassStorage. Put a tick in the box which says "DriverPack MassStorage text mode". Leave all the other settings as it is if you don't know what is it for.

user posted image

After you're done with everything, hit the SlipStream! button and wait for the process to finish. The process should finish in around 10 minutes. After the slipstream process is finish, proceed by downloading CDIMAGE GUI. Extract and run the application, only change the "Root DIR" to your working directory in my case C:\WINXP and the "Iso file Path" to where you want to save the ISO file generated.

user posted image

Select the boot.img file to load the bootable image into the ISO file.

user posted image

Leave all other settings intact as it should unless you know what its doing. (Thanks Sk8teR)

After the ISO file is generated, burn it with any burning software to a CD and proceed with booting the setup. Your SATA hard drive should be recognised now without the need to press F6 and load drivers.

The DriverPack should contain most SATA/RAID device drivers so it should work on most computers.

Read more...

  © Blogger template Simple n' Sweet to ictsematbestari 2011

Back to TOP